 Pictius Free image editor in your browser
Resize an image
Image ▸ Image Size… scales the whole picture to the width and height you type, in pixels or as a percentage. Image ▸ Resize Canvas… does something different: it adds or removes space around the picture without scaling it. Both work on every layer at once, in your browser.
- Free
- No install, no account
- Images stay on your device
- Layers, masks and AI
Change the size in pixels or percent
- Open the image with File ▸ Open… (Ctrl+O).
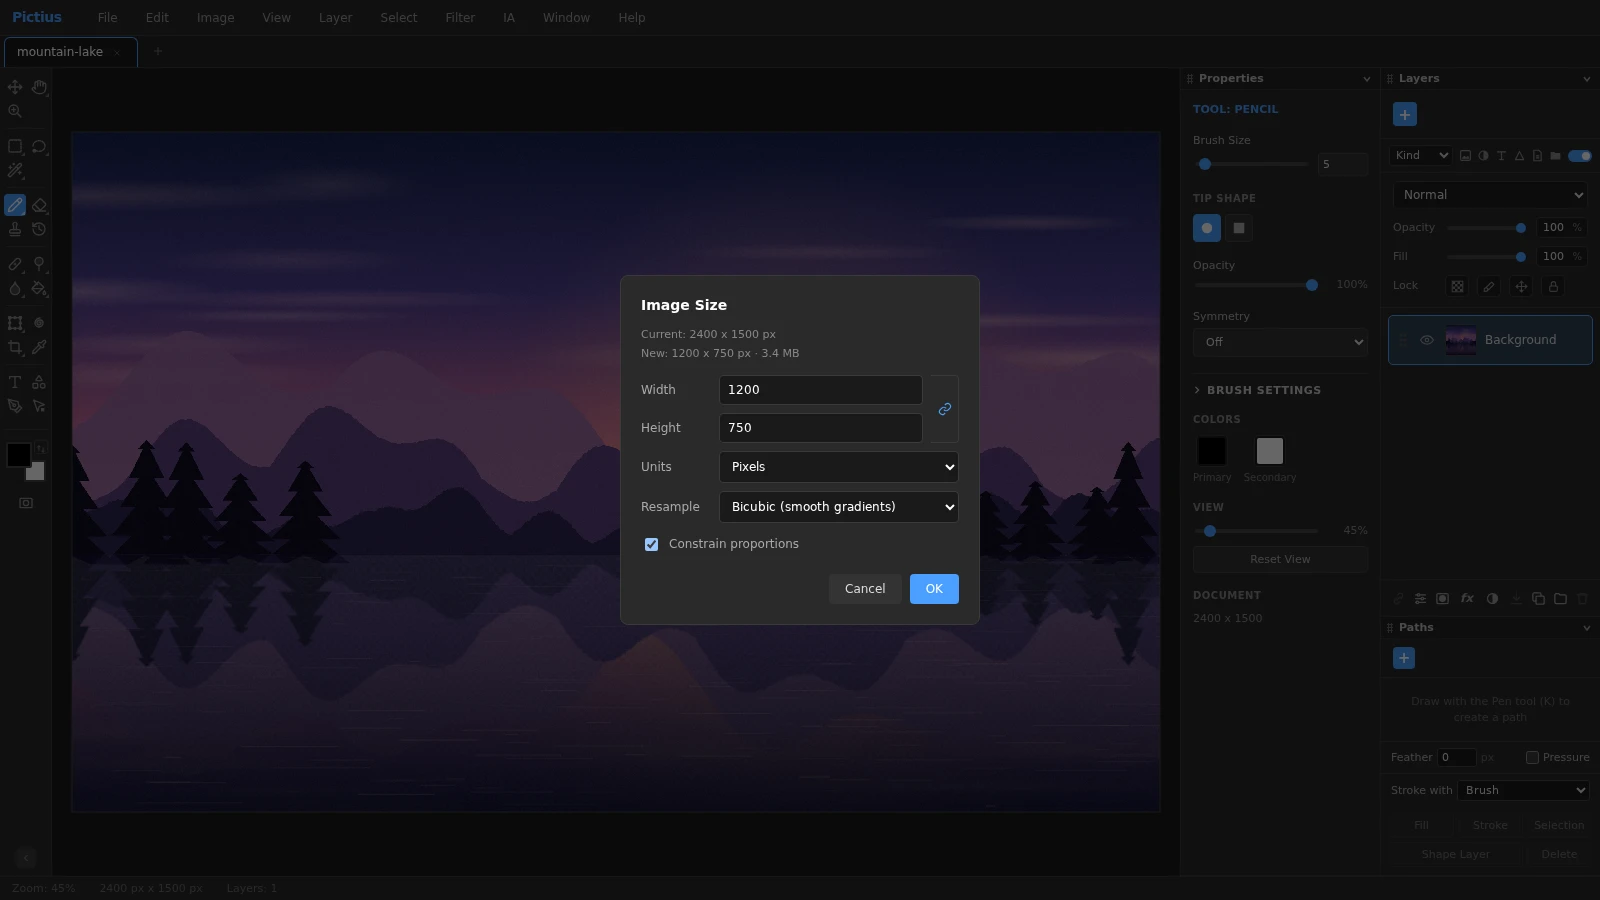
- Choose Image ▸ Image Size… (Ctrl+Alt+I). The top of the dialog shows the current size and the new one.
- Pick Pixels or Percent in Units.
- Leave Constrain proportions on (the link icon) and type the new Width. The Height follows, so the picture is not stretched. Turn it off only if you really want to distort the image.
- Choose a Resample method: Bicubic (smooth gradients) for photos, Nearest Neighbor (hard edges) for pixel art and screenshots, or Bilinear as a middle ground.
- Click OK, then export with File ▸ Export As… in the format you need.
Add space around an image with Resize Canvas
Image ▸ Resize Canvas… (Ctrl+Alt+C) changes the size of the document without scaling its content. Type the new Width and Height, or start from one of the presets for common sizes such as Full HD, square posts or A4. The Anchor Position grid decides where the existing image sits: in the center, a corner or along one side.
On a photo’s Background layer the new area is white; on other layers it is transparent. A smaller canvas cuts off whatever falls outside it.
Other ways to resize
- Only the exported file: the Scale slider in File ▸ Export As… writes a copy from 10% to 400% of the document size and leaves the document as it is.
- Crop and resize in one go: the Crop tool (C) has a W x H x Resolution option that resamples the cropped area to an exact size.
- One layer only: use Edit ▸ Free Transform and drag a corner, or type a percentage for W and H in the Properties panel.
- Many images: File ▸ Automate ▸ Batch… can run the built-in Resize to 1080 px Wide action, or one you record, on a whole set of files.
Good to know
Each side can be up to 16,384 pixels. Reducing an image keeps it sharp, but enlarging it cannot add detail that was never captured: the result gets softer the more you scale it up. Layer masks, shapes, text and smart objects are resized with the picture, and Scale layer styles also scales effects such as strokes and shadows.
Frequently asked questions
How do I resize an image without losing quality?
Making an image smaller with Bicubic keeps it crisp. Making it bigger always softens it a little; see the upscaling guide for the best way to enlarge.
How do I make a photo smaller in kilobytes?
Reduce its pixel size, then export as JPG or WebP from File ▸ Export As… and lower Quality. The dialog shows the estimated file size before you export.
Can I set the DPI for printing?
Image Size works in pixels. The print resolution is set when you export to PDF or TIFF, in the Resolution (dpi) field, and when cropping with W x H x Resolution.
Can I resize several images at once?
Yes, with File ▸ Automate ▸ Batch…: choose the Resize to 1080 px Wide action, or record your own Image Size step in the Actions panel, and run it on all your files.
Why did resizing make my pixel art blurry?
Bicubic and Bilinear blend neighboring pixels. Choose Nearest Neighbor (hard edges) and scale by whole multiples, such as 200% or 300%.
Image editing guides
- Remove the background from an imageRemove the background from a photo in your browser: select the subject with AI, refine the edges with a layer mask and export a transparent PNG. No uploads.
- Remove objects from a photoErase unwanted objects, people or text from a photo: select them and use Content-Aware Fill, AI Fill, Spot Healing or Patch. Everything runs in your browser.
- Cut out hair and objects preciselyCut out people, hair, pets and products: start with Quick Selection or Select Subject, refine the edge in Select and Mask and output a layer mask or a new layer.
- Blur the background of a photoBlur the background of a photo to make the subject stand out: use Portrait Mode, or select the subject and apply Gaussian Blur to the rest. Free, in your browser.
- Crop and straighten a photoCrop a photo to a ratio such as 1:1, 4:5 or 16:9, straighten a tilted horizon, fix perspective with Perspective Crop and trim empty borders. Free, in your browser.
- Upscale an imageEnlarge a small image with Super Resolution 2x, which doubles its size with smooth interpolation and sharpening, or pick an exact size and method in Image Size.
- Convert an image to another formatConvert images in your browser: open PNG, JPG, WebP, AVIF, GIF or PSD files and export PNG, JPG, WebP, GIF, SVG, PDF or TIFF with the quality and scale you choose.
- Images at the right size for social mediaMake images at the right size for Instagram, Facebook, YouTube and more: crop to a preset ratio or use Export for Social Media to resize and save in one step.
- Open and edit PSD files onlineOpen PSD files in your browser with their layers, groups, masks, adjustment layers and effects, see what is kept or approximated, and export PSD, PNG or JPG.
- Add text to an imageAdd text to a photo with editable text layers: set font, size, color and spacing in the Character and Paragraph panels, then add a shadow or stroke with Layer Style.
- Add a watermark to your photosAdd a text or logo watermark to a photo, set its opacity and blend mode, then record it as an Action and apply it to many images at once with Batch.
- Adjust color and exposureFix dark, flat or off-color photos with Levels, Curves, Hue/Saturation and Shadows/Highlights, and keep every edit reversible with adjustment layers.
- Remove blemishes and red eyeRetouch portraits in your browser: remove spots and blemishes with Spot Healing and Healing, clone away distractions with Clone Stamp and fix red eye with one click.
- Layers and masks explainedLearn layers in Pictius: groups, blend modes, layer masks and clipping masks, adjustment layers, and .pictius project files that keep every layer editable.
- Batch edit images with ActionsRecord your edits once as an Action and play it on many images with Batch: resize, adjust, watermark and export them all in one go, right in your browser.