 Pictius Free image editor in your browser
Blur the background of a photo
To blur a background, select the subject, invert the selection and apply Filter ▸ Blur ▸ Gaussian Blur… with the strength you want. For portraits, IA ▸ Portrait Mode does it in one click. Both run in your browser, on your own computer.
- Free
- No install, no account
- Images stay on your device
- Layers, masks and AI
Blur the background with a selection
This works with any subject and lets you choose exactly how strong the blur is.
- Open the photo with File ▸ Open… (Ctrl+O) and keep a copy of the original with Layer ▸ Layer via Copy (Ctrl+J).
- Choose Select ▸ Subject, or paint over the subject with Quick Selection (W). Check the edges and fix them if needed.
- Choose Select ▸ Inverse (Ctrl+Shift+I) so that the background is selected instead of the subject.
- Optionally, use Select ▸ Feather… with 1 to 3 pixels for a softer transition at the edge.
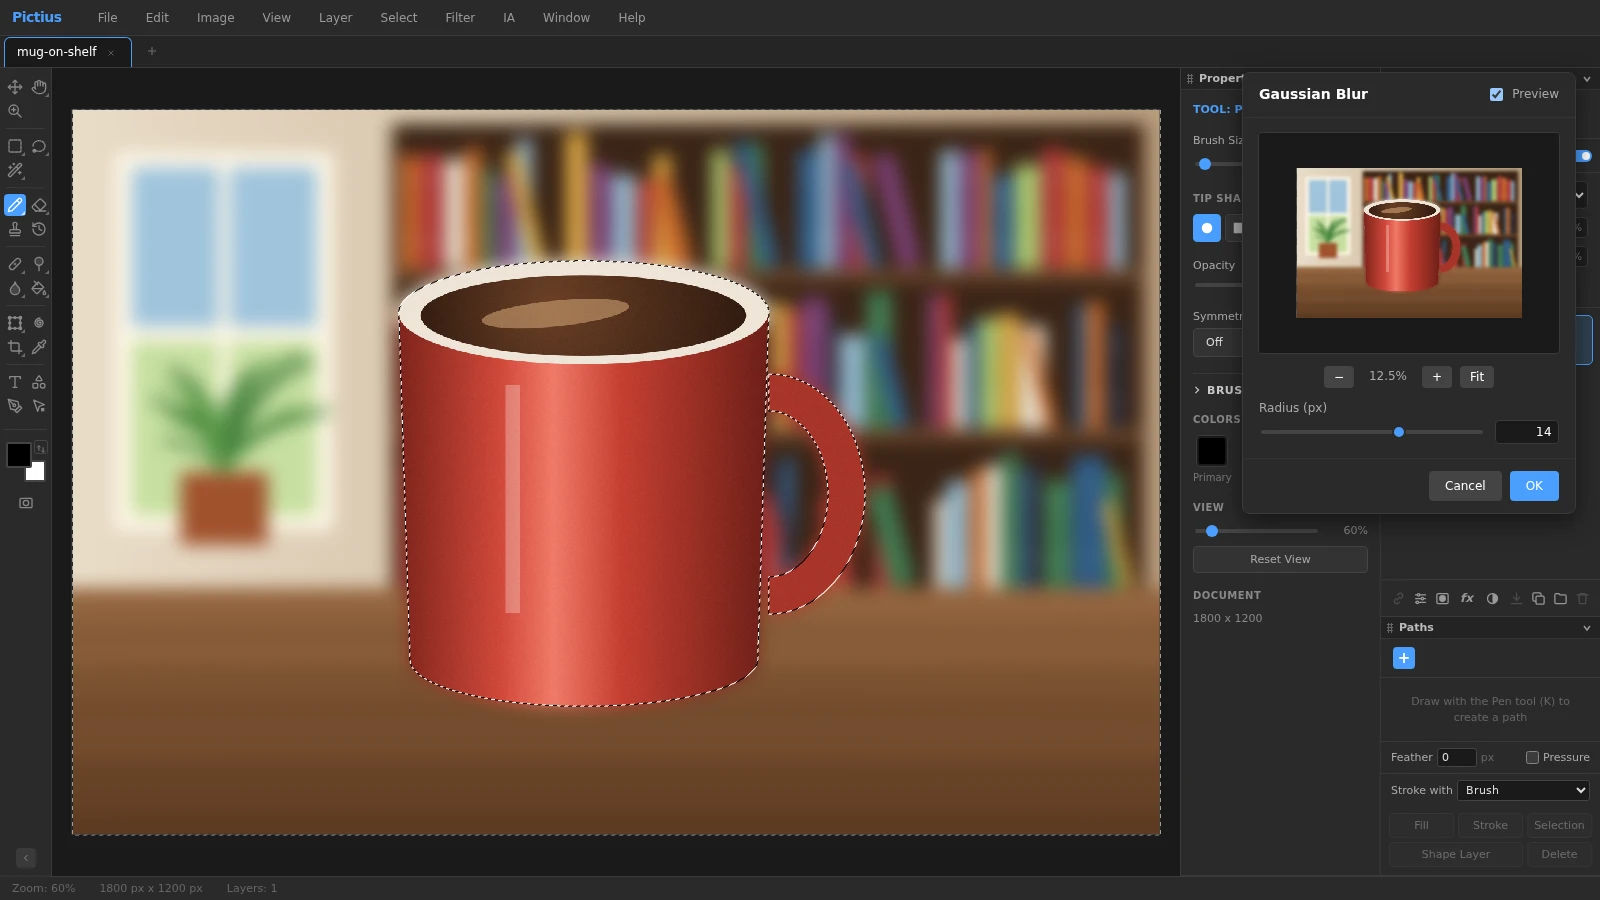
- Open Filter ▸ Blur ▸ Gaussian Blur… and raise Radius while you watch the preview on the canvas. Around 8 to 20 pixels gives a natural look on a typical photo.
- Click OK and deselect with Ctrl+D. Hide the copy in the Layers panel to compare with the original.
One click for portraits: Portrait Mode
IA ▸ Portrait Mode finds the person in the active layer and blurs everything around them. It uses a model trained on people, so it is meant for portraits, selfies and group shots, not for objects or animals. The blur strength is fixed and the result replaces the layer’s pixels, so duplicate the layer first if you want to compare or keep the original. The model is downloaded the first time you use it; the photo stays on your device.
Keep the blur editable with smart filters
If you are not sure about the amount, make the blur non-destructive. Choose Filter ▸ Convert for Smart Filters first, then select the subject, invert the selection and apply Gaussian Blur. The selection becomes the filter mask, and the filter appears under the layer in the Layers panel. Double-click it to change the radius at any time, or paint on the filter mask with black and white to adjust where the blur applies.
Touch-ups and other effects
- The Blur tool (press R) softens small areas by painting, such as a distracting detail near the subject. Strength sets how much each stroke blurs.
- Filter ▸ Blur ▸ Motion Blur… blurs in one direction for a sense of speed, and Radial Blur… gives a spin or zoom effect.
- To make the subject stand out even more, darken or desaturate the background while it is still selected, for example with Image ▸ Adjustments ▸ Hue/Saturation… (Ctrl+U).
Frequently asked questions
Why is there a glow around the subject after blurring?
The blur spreads the subject’s colors into the background near its edge. For a cleaner result, remove the subject from the copy first: select it, use Select ▸ Expand… by a few pixels and Edit ▸ Fill… with Content-Aware, then blur the whole copy and mask it with the inverted subject selection.
Can I change the strength of Portrait Mode?
No, its blur amount is fixed. Use the selection method or smart filters when you want to choose the radius.
Does Portrait Mode work on photos of objects or pets?
Not reliably, because its model is trained to find people. For other subjects, use Select ▸ Subject or Quick Selection and Gaussian Blur.
Is there a lens blur with bokeh shapes?
No. Pictius blurs with Gaussian, Box, Surface, Motion and Radial Blur, which give a smooth blur but do not create bokeh highlights.
Can I blur only part of the background, like the far distance?
Yes. Select just that part with the Lasso before applying the blur, or use smart filters and paint the filter mask with black where you want the image sharp.
Image editing guides
- Remove the background from an imageRemove the background from a photo in your browser: select the subject with AI, refine the edges with a layer mask and export a transparent PNG. No uploads.
- Remove objects from a photoErase unwanted objects, people or text from a photo: select them and use Content-Aware Fill, AI Fill, Spot Healing or Patch. Everything runs in your browser.
- Cut out hair and objects preciselyCut out people, hair, pets and products: start with Quick Selection or Select Subject, refine the edge in Select and Mask and output a layer mask or a new layer.
- Resize an imageResize an image to exact pixels or a percentage with Image Size, choose the resampling method, and add or trim space around it with Resize Canvas. Free and private.
- Crop and straighten a photoCrop a photo to a ratio such as 1:1, 4:5 or 16:9, straighten a tilted horizon, fix perspective with Perspective Crop and trim empty borders. Free, in your browser.
- Upscale an imageEnlarge a small image with Super Resolution 2x, which doubles its size with smooth interpolation and sharpening, or pick an exact size and method in Image Size.
- Convert an image to another formatConvert images in your browser: open PNG, JPG, WebP, AVIF, GIF or PSD files and export PNG, JPG, WebP, GIF, SVG, PDF or TIFF with the quality and scale you choose.
- Images at the right size for social mediaMake images at the right size for Instagram, Facebook, YouTube and more: crop to a preset ratio or use Export for Social Media to resize and save in one step.
- Open and edit PSD files onlineOpen PSD files in your browser with their layers, groups, masks, adjustment layers and effects, see what is kept or approximated, and export PSD, PNG or JPG.
- Add text to an imageAdd text to a photo with editable text layers: set font, size, color and spacing in the Character and Paragraph panels, then add a shadow or stroke with Layer Style.
- Add a watermark to your photosAdd a text or logo watermark to a photo, set its opacity and blend mode, then record it as an Action and apply it to many images at once with Batch.
- Adjust color and exposureFix dark, flat or off-color photos with Levels, Curves, Hue/Saturation and Shadows/Highlights, and keep every edit reversible with adjustment layers.
- Remove blemishes and red eyeRetouch portraits in your browser: remove spots and blemishes with Spot Healing and Healing, clone away distractions with Clone Stamp and fix red eye with one click.
- Layers and masks explainedLearn layers in Pictius: groups, blend modes, layer masks and clipping masks, adjustment layers, and .pictius project files that keep every layer editable.
- Batch edit images with ActionsRecord your edits once as an Action and play it on many images with Batch: resize, adjust, watermark and export them all in one go, right in your browser.