 Pictius Free image editor in your browser
Crop and straighten a photo
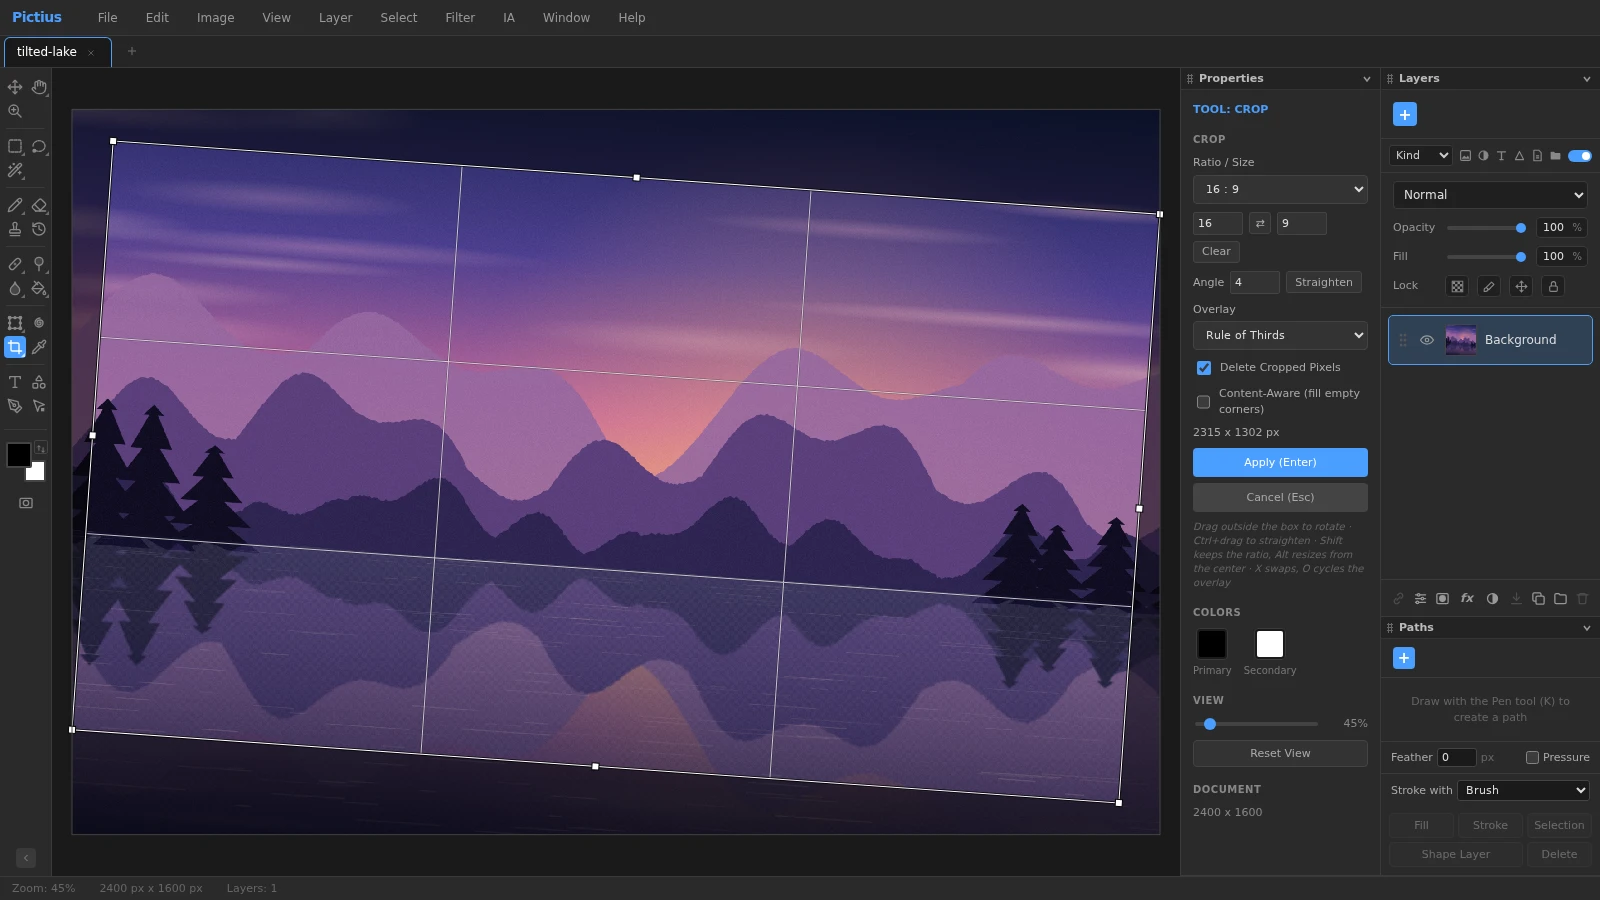
Press C for the Crop tool, pick a ratio, drag the box over the part you want to keep and press Enter. The same tool straightens a tilted horizon, and Perspective Crop squares up documents, signs and buildings shot at an angle.
- Free
- No install, no account
- Images stay on your device
- Layers, masks and AI
Crop a photo to a ratio
- Open the photo with File ▸ Open… (Ctrl+O) and press C to select the Crop tool.
- In the Properties panel, choose a ratio in Ratio / Size: Original Ratio, 1 : 1 (Square), 4 : 5 (8 : 10), 16 : 9, 3 : 2, or Custom W : H to type your own. Leave Ratio for a free crop. ⇄, or X, swaps portrait and landscape.
- Drag on the photo to draw the box, or drag the handles of the canvas inward. Drag inside the box to move it, and use the arrow keys for small nudges.
- Use the overlay to place the subject: Rule of Thirds, Grid or Golden Ratio. O cycles through them.
- Press Enter, or click Apply, to crop. Escape cancels.
Straighten a tilted horizon
With the Crop tool active, click Straighten in the Properties panel and draw a line along the horizon, or hold Ctrl and drag. The box rotates to level that line and shrinks to the largest area that still fits inside the photo, so no empty corners appear. You can also type an Angle, or drag just outside the box to rotate it by hand; hold Shift to rotate in 15° steps.
If you would rather keep the full size, turn on Content-Aware (fill empty corners): the corners left by the rotation are filled from the surrounding image after the crop.
Fix perspective with Perspective Crop
Press C again to switch to Perspective Crop. Click the four corners of something that should be rectangular, such as a document, a painting or the front of a building, then drag each corner exactly onto its edge. Show Grid helps to line up straight edges. Press Enter and the area is cut out and squared up. Leave W and H empty to keep the natural proportions, or type the output size.
More crop options
- Exact size: choose W x H x Resolution in Ratio / Size to crop and resample to a precise size in px, in or cm.
- Keep what you crop: turn off Delete Cropped Pixels and the hidden parts stay in their layers. Image ▸ Reveal All brings them back later.
- Crop to a selection: draw a selection with any tool and choose Image ▸ Crop.
- Remove empty borders: Image ▸ Trim… cuts away transparent pixels or a border of the same color as a corner pixel, on the sides you choose.
- Make the canvas bigger: drag the box handles beyond the edge of the photo to add space.
Frequently asked questions
How do I crop a photo to a square?
Press C, choose 1 : 1 (Square) in Ratio / Size, place the box and press Enter.
Can I undo a crop?
Yes, with Ctrl+Z or in the History panel. If Delete Cropped Pixels was off, you can also bring the cropped parts back with Image ▸ Reveal All at any time.
How do I rotate a photo by 90 degrees?
Use Image ▸ Rotate 90° CW or Image ▸ Rotate 90° CCW. Image ▸ Flip Horizontal mirrors the whole picture.
Why did straightening make my photo smaller?
A rotated photo no longer fills a straight frame, so Straighten crops the empty corners away. Turn on Content-Aware (fill empty corners) to keep more of the image.
Does cropping reduce image quality?
A plain crop only removes pixels, so what remains is unchanged. Rotating, Perspective Crop or a W x H x Resolution size resample the image once.
Image editing guides
- Remove the background from an imageRemove the background from a photo in your browser: select the subject with AI, refine the edges with a layer mask and export a transparent PNG. No uploads.
- Remove objects from a photoErase unwanted objects, people or text from a photo: select them and use Content-Aware Fill, AI Fill, Spot Healing or Patch. Everything runs in your browser.
- Cut out hair and objects preciselyCut out people, hair, pets and products: start with Quick Selection or Select Subject, refine the edge in Select and Mask and output a layer mask or a new layer.
- Blur the background of a photoBlur the background of a photo to make the subject stand out: use Portrait Mode, or select the subject and apply Gaussian Blur to the rest. Free, in your browser.
- Resize an imageResize an image to exact pixels or a percentage with Image Size, choose the resampling method, and add or trim space around it with Resize Canvas. Free and private.
- Upscale an imageEnlarge a small image with Super Resolution 2x, which doubles its size with smooth interpolation and sharpening, or pick an exact size and method in Image Size.
- Convert an image to another formatConvert images in your browser: open PNG, JPG, WebP, AVIF, GIF or PSD files and export PNG, JPG, WebP, GIF, SVG, PDF or TIFF with the quality and scale you choose.
- Images at the right size for social mediaMake images at the right size for Instagram, Facebook, YouTube and more: crop to a preset ratio or use Export for Social Media to resize and save in one step.
- Open and edit PSD files onlineOpen PSD files in your browser with their layers, groups, masks, adjustment layers and effects, see what is kept or approximated, and export PSD, PNG or JPG.
- Add text to an imageAdd text to a photo with editable text layers: set font, size, color and spacing in the Character and Paragraph panels, then add a shadow or stroke with Layer Style.
- Add a watermark to your photosAdd a text or logo watermark to a photo, set its opacity and blend mode, then record it as an Action and apply it to many images at once with Batch.
- Adjust color and exposureFix dark, flat or off-color photos with Levels, Curves, Hue/Saturation and Shadows/Highlights, and keep every edit reversible with adjustment layers.
- Remove blemishes and red eyeRetouch portraits in your browser: remove spots and blemishes with Spot Healing and Healing, clone away distractions with Clone Stamp and fix red eye with one click.
- Layers and masks explainedLearn layers in Pictius: groups, blend modes, layer masks and clipping masks, adjustment layers, and .pictius project files that keep every layer editable.
- Batch edit images with ActionsRecord your edits once as an Action and play it on many images with Batch: resize, adjust, watermark and export them all in one go, right in your browser.