 Pictius Free image editor in your browser
Layers and masks explained
Layers are sheets stacked on top of each other: each holds part of the image, and you can move, hide, blend or change one without touching the rest. Masks hide parts of a layer without erasing them. Together they let you undo any decision later, which is what non-destructive editing means. This guide covers the essentials in Pictius.
- Free
- No install, no account
- Images stay on your device
- Layers, masks and AI
Work with layers, step by step
Everything happens in the Layers panel (Window ▸ Layers), where the top row covers the ones below.
- Open a photo with File ▸ Open… (Ctrl+O). It becomes the Background layer.
- Add a layer with the + button or Layer ▸ New Layer, copy one with Layer ▸ Duplicate Layer, or bring in another picture with File ▸ Open as Layer…
- Drag rows to change the order, or use Ctrl+] and Ctrl+[ to move the selected layer up or down. Click the eye to hide a layer and double-click its name to rename it.
- Set Opacity and the blend mode at the top of the panel. Fill fades the layer’s pixels but keeps its effects, such as a shadow, at full strength.
- To group layers, select them with Ctrl+click or Shift+click and press Ctrl+G (Layer ▸ Group Layers). The triangle folds the group, and the group has its own opacity, blend mode and mask.
Blend modes worth knowing
A blend mode decides how a layer mixes with what is below it:
- Multiply darkens: white disappears, so it suits shadows, line art and textures on a white background.
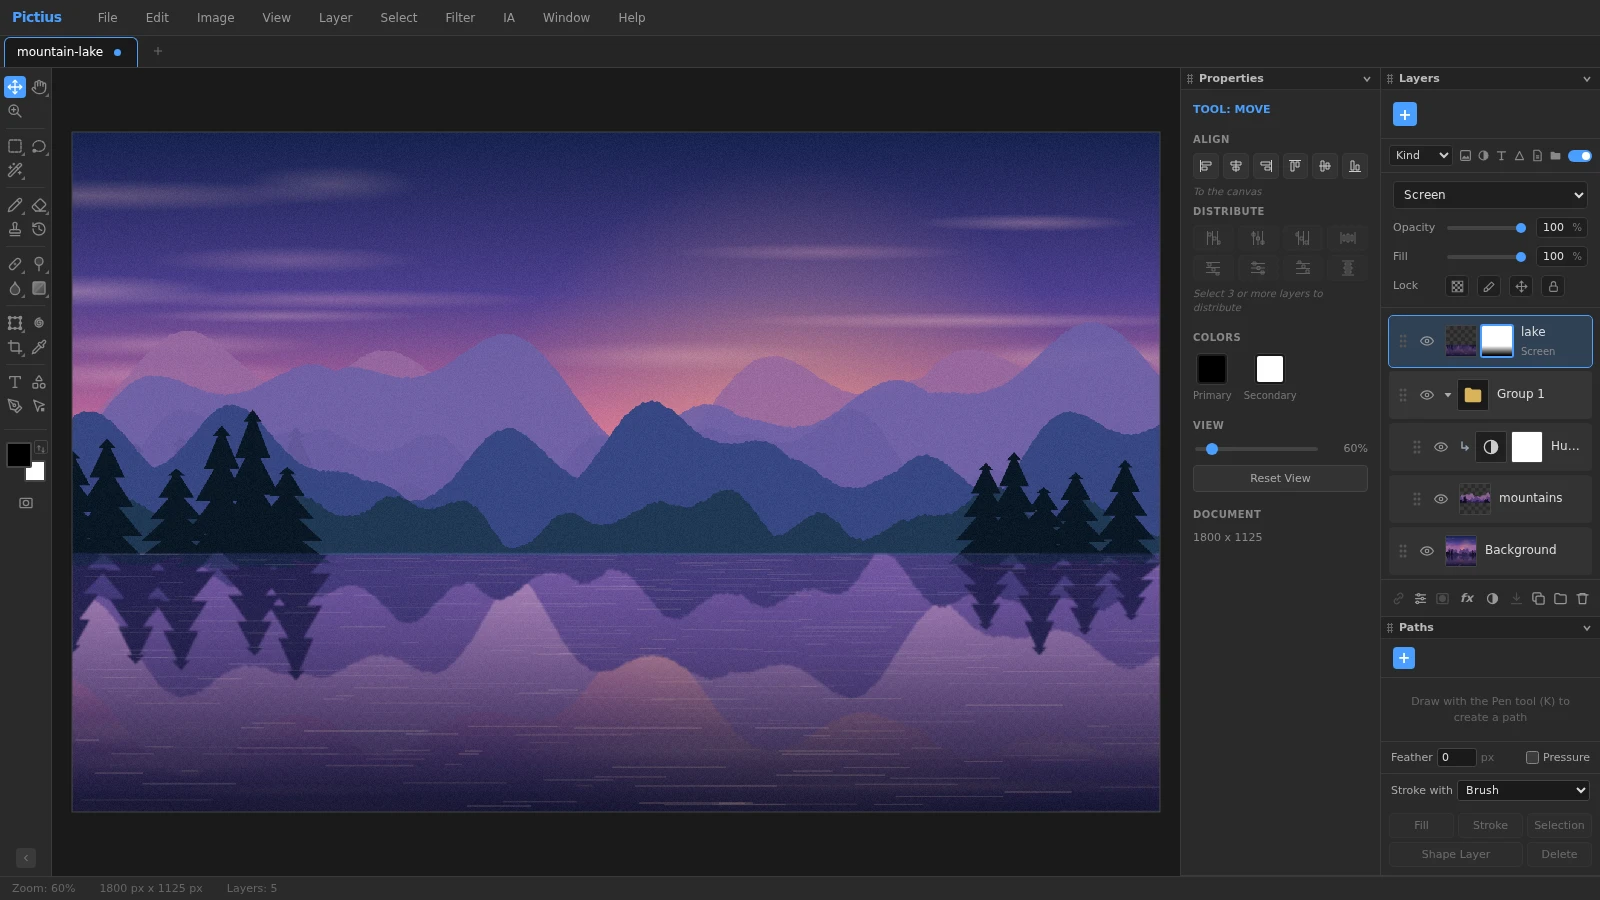
- Screen lightens: black disappears, which suits glows, light leaks and reflections, like the lake in the screenshot.
- Overlay and Soft Light add contrast and work well for textures.
- Color and Luminosity apply only the color or only the brightness of the layer.
Layer masks: hide without erasing
Select a layer and choose Layer ▸ Add Layer Mask: Reveal All, or click the mask button at the bottom of the panel (Alt+click for Hide All). With a selection active, Layer ▸ Add Layer Mask from Selection keeps only the selected area visible.
The new mask is ready to edit. Paint black with the Brush (B) to hide, white to reveal and gray for partial transparency; X swaps the two colors and D resets them to black and white. Drag the Gradient tool (Shift+G) across the mask for a smooth fade. Click the layer’s own thumbnail to go back to its pixels.
On the mask thumbnail, Shift+click turns the mask off and on, and Alt+click shows it alone. Layer ▸ Apply Layer Mask makes the result permanent; Layer ▸ Delete Layer Mask removes it.
Clipping masks and adjustment layers
A clipping mask shows a layer only where the layer below it has pixels. Choose Layer ▸ Create Clipping Mask (Ctrl+Alt+G), or hold Alt and click the line between the two layers. Use it to put a photo inside text, or to make an adjustment layer change only the layer below, as the Hue/Saturation in the screenshot does with the mountains.
Adjustment layers, from Layer ▸ New Adjustment Layer, change the colors of everything below them, and you can edit them at any time by double-clicking their icon.
Keep everything with .pictius files
File ▸ Save (Ctrl+S) writes a .pictius project with every layer, group, mask, adjustment, text, shape and smart object, plus paths, channels and guides. PNG, JPG and WebP flatten the image into one layer, so save the project too whenever you may want to change something later.
Frequently asked questions
Why use a layer mask instead of the Eraser?
The Eraser deletes pixels for good once its step leaves the history. A mask only hides them: paint white on the mask and they come back, even after saving and reopening a .pictius file.
Why can my brush not paint on a layer?
Check the Layers panel: the mask may be selected instead of the pixels, the layer may be locked, or it may be a group, an adjustment, a text or a shape layer. Click the layer thumbnail, or answer yes when Pictius asks to rasterize.
Can I open a .pictius file on another computer?
Yes. It is a regular file: copy it anywhere and open it with File ▸ Open… in Pictius on any computer with a recent browser.
Are layers and masks kept in PSD files?
Yes. File ▸ Save a Copy as PSD writes groups, blend modes, masks, clipping masks and adjustment layers, and PSD files you open keep theirs. The PSD guide lists the few things that are approximated.
How many layers can a document have?
There is no fixed limit. Each layer is a full-size image in memory, and so is every history step, so very large documents with many layers can slow the browser down. Merge Down (Ctrl+E) or Flatten Image reduce the count.
Image editing guides
- Remove the background from an imageRemove the background from a photo in your browser: select the subject with AI, refine the edges with a layer mask and export a transparent PNG. No uploads.
- Remove objects from a photoErase unwanted objects, people or text from a photo: select them and use Content-Aware Fill, AI Fill, Spot Healing or Patch. Everything runs in your browser.
- Cut out hair and objects preciselyCut out people, hair, pets and products: start with Quick Selection or Select Subject, refine the edge in Select and Mask and output a layer mask or a new layer.
- Blur the background of a photoBlur the background of a photo to make the subject stand out: use Portrait Mode, or select the subject and apply Gaussian Blur to the rest. Free, in your browser.
- Resize an imageResize an image to exact pixels or a percentage with Image Size, choose the resampling method, and add or trim space around it with Resize Canvas. Free and private.
- Crop and straighten a photoCrop a photo to a ratio such as 1:1, 4:5 or 16:9, straighten a tilted horizon, fix perspective with Perspective Crop and trim empty borders. Free, in your browser.
- Upscale an imageEnlarge a small image with Super Resolution 2x, which doubles its size with smooth interpolation and sharpening, or pick an exact size and method in Image Size.
- Convert an image to another formatConvert images in your browser: open PNG, JPG, WebP, AVIF, GIF or PSD files and export PNG, JPG, WebP, GIF, SVG, PDF or TIFF with the quality and scale you choose.
- Images at the right size for social mediaMake images at the right size for Instagram, Facebook, YouTube and more: crop to a preset ratio or use Export for Social Media to resize and save in one step.
- Open and edit PSD files onlineOpen PSD files in your browser with their layers, groups, masks, adjustment layers and effects, see what is kept or approximated, and export PSD, PNG or JPG.
- Add text to an imageAdd text to a photo with editable text layers: set font, size, color and spacing in the Character and Paragraph panels, then add a shadow or stroke with Layer Style.
- Add a watermark to your photosAdd a text or logo watermark to a photo, set its opacity and blend mode, then record it as an Action and apply it to many images at once with Batch.
- Adjust color and exposureFix dark, flat or off-color photos with Levels, Curves, Hue/Saturation and Shadows/Highlights, and keep every edit reversible with adjustment layers.
- Remove blemishes and red eyeRetouch portraits in your browser: remove spots and blemishes with Spot Healing and Healing, clone away distractions with Clone Stamp and fix red eye with one click.
- Batch edit images with ActionsRecord your edits once as an Action and play it on many images with Batch: resize, adjust, watermark and export them all in one go, right in your browser.